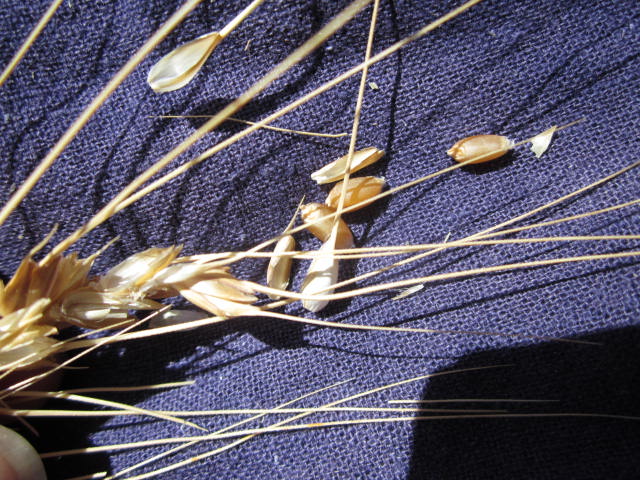
Saturday, September 28, 2013

Photo Journal of Fall Farm Goings-On

It's been a long, busy summer here. Here are some of the things that are going on around the farm this fall:

1. We've had an awesome tomato season, harvesting about 20 different varieties, mostly heirlooms. Earlier this month, we had our annual tomato tasting potluck party. As usual, we chose the hottest day of the month (not on purpose) for this event, but about 25 brave souls came out anyway to taste our best tomatoes.


2. We are also having a great year for winter squashes, and we're getting ready to harvest most of them this week. The butternuts look particularly promising.

3. Our fall crops are just about all planted now, and the weeds are going nuts, as usual, but so far I've been able to keep the veggies taller than most of the weeds.

4. I'm preserving food for the harsh California winter. Just kidding. Despite our year-round growing season, it'll be nice to have these ginger plums, plus tomato sauce, blackberry jam, etc. in the cold months.

5. Hubby is bravely clearing blackberry brambles out of the creek bed. The creek is dry right now, but once it starts raining it fills up quickly. Last year it came within inches of overflowing the banks. We're trying to give the water a little deeper channel to flow on out of here this winter.


Monday, July 1, 2013

Threshing and Winnowing Wheat by Hand

Wheat kernels
This is the continuation of the previous post, in which I described our foray into small-scale wheat growing and harvesting. At the end of June, we hosted a threshing bee here on the farm! Several of our friends and farm members came over to share a meal and to help us bring in the grain harvest. Both kids and adults seemed to have a tremendously fun time of it, and we all ended up with quite a bit of wheat by the end (I don't know exactly how much, since everyone got to take home wheat if they wanted). Here is how it went:

1. Threshing
Threshing in a pillowcase
The basic idea of threshing is to knock the wheat kernels off the stalks. We found a few ways to accomplish this, all of which were good fun. One of my favorite ways was to put a sheaf of wheat in a pillowcase, hold the pillowcase closed, and beat it with a stick for about 5 minutes, turning occasionally. Other methods included, smacking the wheat against the sides of a bucket, stomping on the wheat in a sturdy box, and swinging the bag of wheat against a hard surface.

2. Winnowing
If you are using a pillowcase, carefully pour the wheat into a bucket. I like to then shake it back and forth several times. The wheat falls to the bottom, and the chaff (hulls, stems, etc.) rises to the top. Then I scoop off the chaff and discard it. The next step is to pour the wheat (carefully!) from one bucket to another, allowing the chaff to blow away in the wind. If it's not windy, a box fan will speed up the process. You'll have to pour it back and forth about 5-6 times before it's clean.
Winnowing with a fan

3. Storing and Eating
The wheat berries should now be fairly free of chaff and ready to store. I just put mine in an airtight container in the cabinet. They are very dry and hard, so I imagine they'll last a long time. So far, I've been eating them as a whole grain, like rice, rather than grinding them into flour. Wheat berries are totally delicious! Simply put them in a pot with water at a ratio of approximately 3:1 water to wheat. Bring it to a boil for about 5 mins, then lower to a simmer and cook for about an hour, stirring occasionally. Then you can season them as you like and eat them warm or cold. I am particularly fond of mixing them with plain yogurt, salt, zatar (Middle Eastern seasoning mix), and olive oil.
Some of the finished product

Update: I just finished threshing and winnowing the last of the wheat. We ended up with about 10 quarts of wheat berries, which is 20 lbs., out of an area of about 240 square feet.
 

Saturday, June 8, 2013

Planting and Harvesting Wheat by Hand

One of the new things we tried on the farm this year was growing a small patch of wheat. Although we're not thinking of becoming wheat farmers, I thought it would be interesting to try to grow a grain since they are such a staple in our diet. I'm sharing our process here because I found very little information available about wheat growing on a garden-scale. My disclaimer is that this is our first time growing wheat, so we are definitely not experts on the subject.

We are in USDA zone 9b, and we planted the wheat in October. It's Hard Red Winter Wheat, one of the most common varieties. We planted an area of about 240 square feet. To plant the wheat, we just made furrows with a hoe, sprinkled the seed in and then used the hoe to cover it with soil. We irrigated it with sprinklers until the winter rains came. It was extremely easy to grow and basically looked like grass throughout the winter and early spring. It started making heads in early May.
Heads filling out in mid-May

Next came the critical step of figuring out when to harvest it. Based on what I've read and an introductory workshop at Pie Ranch, I determined that the wheat should be all brown, and the kernels should not be chewy anymore. However, you don't want to wait so long that the plants drop their seed. We began the harvest on May 31st.

Since this is just a small experimental patch, I didn't want to buy any special tools or equipment for harvesting. We ended up using a serrated knife and pruning shears. I think the knife was probably more efficient. We grabbed each handful of wheat near the base and cut through the stalks with the knife. I found that it's easier to start with small bundles, about 3-4 inches in diameter. While holding the bundle in my left hand, I would use my right hand to tie it together. I found the most efficient thing to do was  use a stalk of the wheat to tie it. I would just bend the stalk about halfway up, wrap it tightly around the bundle (twice if possible) and then tuck the end into the wrapped part to secure it in place. Each of these bundles is called a sheaf.

Using a wheat stalk to bind the sheaf
Harvesting a sheaf
 We collected the sheaves in a big box, and when it was full, we brought the sheaves to an open place in the yard and stacked them together into "shocks." Each shock consisted of about 15 sheaves of wheat leaning together, with the seed heads up, so as to hold each other up. The best way I found to do this was to choose four of the larger sheaves and carefully lean them together to form the base. The key is to gently squeeze the heads together, so they tangle up and hold onto each other. Then I just keep adding additional sheaves in sets of two on opposite sides. Finally, I covered the top of the shock with a piece of row cover/remay (cheesecloth would work too). It's not as pretty with the cover, but it'll keep the birds off.
Bringing in the sheaves!
Now we'll wait until the wheat is completely dry, and then we'll begin the process of threshing and winnowing, which will separate the wheat grains from the chaff. To be continued....
Some of the sheaves shown here are covered and some not

Thursday, May 9, 2013

Zucchinis... Coming Right Up!

Thanks to a super-warm spring, our zucchini plants are already quite big, and it looks like we may have our first harvest as early as next week. I'm really happy that they look so good because I nearly lost them after transplanting due to an irrigation mistake.

Around this time of year, I always like to clarify the difference between zucchini, summer squash, and winter squash. The short answer is that there is almost no difference. Summer squash refers to fruits that are harvested before their seeds mature, when their skin is still soft. Zucchini is one kind of summer squash, as is yellow crookneck, pattypan, etc. Winter squash are mature squash fruits with hard skins. Winter squash include butternut, acorn, and spaghetti squash. An immature winter squash is a summer squash, and a way overgrown zucchini becomes like a winter squash. Of course, the varieties we know as summer squash have qualities that make them particularly good for that purpose, and same goes for winter squash. To clarify another common misconception, both are grown in the summer. Winter squash are harvested in the fall, and keep well in storage over the winter, hence the name.
Female squash flower with Golden Zucchini forming underneath.

Male squash flower (no fruit forms beneath it)

Thursday, April 25, 2013

Our New Logo

Here it is, our beautiful new logo!


Look for it wherever the freshest, most delicious produce is sold (within Morgan Hill, that is).

The logo was designed by CSA member Marieke Ruys http://mariekeruys.com. Check out her collection of hand-printed, eco-friendly napkins, the perfect accompaniment to all your locavore meals.

Monday, April 15, 2013

First CSA Delivery of the Season!

The first delivery of the spring season will be this Wednesday, April 17th! I'm getting very excited seeing how well our spring produce is doing right now. The first bag will include: beets, carrots, garlic, lettuce, mustard greens, tatsoi, bok choy, mint, mizuna, artichokes, and lemons.


Perfect for a stir-fry, with lots of Asian greens!

Friday, March 29, 2013

High Tunnel is Up! Many Thanks to our Helpers!

We finished putting on the plastic this morning.
The high tunnel is just about finished, and we wanted to say a huge "thank you" to all of you who helped us make this happen! Special thanks to our WWOOF volunteer, Madeline, who put in several 10-hour+ days on this project and our neighbor, Dan, who gave us free reign of his tool shed all week and to Mike from People and Planet who kept us fueled up with a big box of bananas and apples. Also much thanks to Bart, Pieter, Nineveh, Ariella, Jynelle, Kyrod, Tim, Craig, Lynn, and Nina who all gave up part of their weekend and plenty of sweat to get it done.

Hanging the first door.

Lots of drilling into steel on ladders- hard work!

Shoveling gravel under the baseboards - also a good workout!
Putting up purlins.


Ladders moving everywhere.


More drilling on ladders.

Victorious!


Monday, March 18, 2013

It's a Barn Raising!

Saturday and Sunday March 23rd and 24th, from 10am-5pm

This is the first arch. We have 11 more to go!
Gal has been busy with the sledgehammer.
It’s actually a high-tunnel raising, but same concept. A barn raising is when members of a community come together to help assemble and raise the frame of a barn — or in our case, a high-tunnel — which is too big a job for the farmers to do alone. A high-tunnel is a type of greenhouse, basically a big metal frame covered with plastic, which we will plant under. We were awarded a grant from NRCS to purchase this high-tunnel, and we need to finish assembling it in time for our April planting. So the race is on!

The posts that form the foundation are already in place, and it’s time to put up those big metal hoops. This is a big job, and we are humbly requesting the help of our community of friends, neighbors, and CSA members. You do not have to be an experienced construction worker or super-strong to help out. Jobs will include piecing together the metal hoops, helping to hoist them into place, and bolting together the supporting pieces. If you have a drill, please bring it. Also, we are greatly in need of a tall, free-standing (A-frame) ladder, 10 feet or taller. The barn raising is both Saturday and Sunday. We hugely appreciate any help you can provide, whether for an hour or a day. We hope this will be a fun community-building time with a sense of accomplishment at the end. We will provide cold drinks and light refreshments.

All are welcome. Many hands make light work.

900 W. Edmundson Ave., Morgan Hill

Thank You,
Michelle and Gal

The finished product should look something like this.


Thursday, March 14, 2013

When Life Gives You Lemons....

Save some for later! That's the only answer to the bushels of lemons that are falling all over our driveway. We seem to have an ideal climate for growing lemons. When lemon season hits here, there are more lemons than anyone could possibly use.

I've been working on freezing the juice for the times of year when there are none. It's a pretty straightforward process. I just squeezed the lemon juice through a strainer into a big bowl. Then when the bowl seemed full enough, I began pouring it through a funnel into ice cube trays. After it's frozen, I will pop out the lemon cubes and put them in bags for easier storage. Hopefully, we'll be able to break off a cube of lemon juice whenever we need some.

The lemon juice factory
Our wonderful tree. Actually our neighbor's tree coming over onto our side, but they don't mind.

Tuesday, February 12, 2013

Happy Chickens on New Pasture

Salad up to her knees! They'll have this area looking totally bare in about a month.
Every 2-4 weeks, we move our chickens to a new spot around the farm. This month their pasture is particularly lush. They are virtually swimming in a salad bar of grass, field peas, and fava beans. Lucky ladies! This is our rainy season in California, and thus, our green season.

Rolling coop in a new pasture.
We move them around for a number of reasons. First, it makes chickens happy. They love to eat fresh greens, and the greens in their diet make better eggs and healthier chickens. The only thing they love more than greens is bugs, and they do a lovely job of cleaning up all the pests out of their area. Of course, their manure is an excellent fertilizer, and by moving them around, they distribute it evenly throughout the farm. They even do us the favor of light tillage with their constant scratching and digging.

We built a rolling coop for the purpose of moving the chickens around. Many farmers use electric fencing for pastured animals, but so far we've gotten by using a plastic chicken fencing, about 3 ft tall. It takes us about an hour of work to move them from one pasture to another. It's a bit of a hassle, it seems worth it. 


Monday, January 21, 2013

End of this CSA Season

Our plants look like this most mornings.
This Wednesday, January 23rd, will be the last CSA delivery of the season. We've had frost just about every morning for the past month. The frost, combined with the short day length and wet soil, means that we haven't been able to grow replacement crops for those we are harvesting. It's okay; that's winter, and it's to be expected. We plan to restart our CSA in April, and we'll be notifying everyone by email and Facebook when we're ready to sign-up members again. If you're not already on our contacts list, and you'd like to be, please fill out the membership form http://www.1-acre-farm.blogspot.com/p/sign-up-to-get-veggies-delivered.html

Lots of people have remarked on how nice it will be to have a vacation over the next couple months. Yeah, right. While we do hope to take a vacation (keep fingers crossed), there's still much work to be done in order to keep things running and get ready for spring. The bigger jobs include tilling the soil for spring and summer plantings, growing thousands of seedlings in the greenhouse, pruning fruit trees, and doing winter plantings of asparagus and strawberries. See you in spring!

Thursday, January 3, 2013

Cauliflower, a Long Time Coming

(L-R) Broccoli, Romanesco, and Cauliflower

This week we had a beautiful harvest of cauliflower, broccoli and romanesco! Although most people think of cauliflower as a fairly common veggie, as opposed to something like fancy heirloom tomatoes, cauliflower actually is quite difficult to grow. Once tomatoes are established, they give many pounds of fruit continually for about 3 months. Cauliflower takes just as long to grow (We seeded today’s cauliflower back in July!), and each plant makes only one head. Although the leaves are also edible, most people don’t eat them, so it’s a 1-harvest crop. Cauliflower is a cool-weather crop, and we only grow it in the fall now because we’ve found that spring cauliflower tends get aphids and cabbage loopers, and it bolts (goes to flower) as soon as we get a hot day. The cauliflower we're harvesting now was covered with shade cloth back when the weather was hot and later with another type of row cover to keep it warm and keep the bugs off. Now that we’re getting cold nights, we’ve also lost some of the heads to frost damage. These are a few of the reasons why our fall CSA tends to feature much more leafy greens, like kale, which grows in only 2 months and can be harvested continuously for many months. 
A mature plant is about 3 ft. tall with huge leaves.

I just want folks to have some idea of what it takes to grow a vegetable that most Americans think of as relatively inexpensive and common. How does organic cauliflower arrive at the grocery store year-round for about $3/head? I really don’t know. Surely, it's due in part to economy of scale, i.e. larger farms can grow big fields of cauliflower and mechanize the process. I also think it has a lot to do with importing from other regions and countries when it's out of season here, underpaid farm labor, and maybe climate-controlled greenhouses.

If you have tips for growing cauliflower efficiently, let us know. We're still learning!