Saturday, October 20, 2012

Saving Tomato Seeds, part 2

Welcome back! Last week I began the process of saving tomato seeds (described in the "Saving Tomato Seeds, part 1" blog post). I left the seeds to ferment for about 3 days, and they developed a nice scummy surface indicating that they were ready.
Tomato seeds after 3 days of fermentation.
At this point, the seeds should have a somewhat stinky, fermented smell, but nothing too gross. The seeds were at the bottom, and the liquid on top, so I was able to carefully decant the liquid off. I then tapped the seeds into a strainer and rinsed them under fresh water. I use this handy little strainer that I bought years ago in Chinatown. I don't know what its original purpose was, but it's perfect for this. A tea strainer would work equally well.
Clean tomato seeds in a strainer.

Next I tapped the seeds out onto a piece of wax paper and labeled the paper with the variety of tomato.
Tomato seeds on wax paper ready to be dried.

I left the seeds to dry for about 3-4 days away from the light. Then I carefully peeled them up off the wax paper and put them in envelopes to store until spring. See you next year, tomatoes!

Monday, October 15, 2012

Saving Tomato Seeds, part 1

One of my favorite farming activities is saving seeds. I love seeing the full cycle of the seasons from seed to seed; I love the independence of not having to buy seed every year, and I love learning about the various mechanisms plants have developed for continuing themselves. Fall is a good time for saving the seeds of summer plants, and anyone growing heirloom tomatoes will probably want to save seeds from their favorites. An heirloom plant will make seeds that are genetically similar to the parent plant, unlike hybrids which make seeds that can have the traits of any of the ancestor plants. Tomato seed saving is a little more complex than other saving other seeds because it involves a brief fermentation process. The fermentation step helps kill any plant diseases.

There are great directions for saving tomato seed on gardenweb.com I thought it would be nice to have photo illustrations too, so here are the steps (This is the first part. Part 2 will be posted soon):

1.  Choose a slightly overripe tomato from your healthiest tomato plant(s). We grew 16 varieties of tomatoes this year, and I am saving seeds from many of them.
 
Several varieties of heirloom tomatoes ready to have their seeds saved.

2. Slice the tomato horizontally, across its "equator."
3. Squeeze the seeds, including their gel goo, out into a clean jar or other container. Add a couple tablespoons of water.
Tomato seeds in a clean, reused container with water.

 4. Cover the container with a lid or a piece of cellophane, and poke a few holes in it for ventilation. Label with the variety if you are saving more than one kind. Place in a warm, dark place for 2-3 days.
My full menagerie of tomato seeds in various reused containers.

Part 2 is coming soon! Stay tuned.

Monday, October 1, 2012

End-of-Summer Canning

Pickles, plums, tomato sauce, strawberry jam, and blackberry preserves
When we moved to Morgan Hill a few years ago, my parents gave me a canning kit as a gift to help us realize our homesteading dreams. Preserving food was all new to me. Both of my grandmothers were modern career women who were somewhat appalled when I took up knitting, so you can imagine that I don't have a lineage of home-ec types to draw upon in my canning endeavors. Fortunately we have the internet and some books to help us. I tend to rely on the Ball "Blue Book" and "Keeping the Harvest" by Chioffi and Mead. It's definitely been a messy learning process, but in my third season I'm finally getting the hang of it.
A bit of the summer bounty. Getting ready for the CSA members.

Whether you have a farm, a garden, or just an interest in eating locally, preserving food makes a lot of sense. By late summer we are giving our CSA members large amounts of tomatoes; we eat tomatoes with almost every meal, and we still have more than we can possibly use. By November, though, the tomato plants will be dead, and we won't have any more until next July. So, we do what we can to preserve some of the tomatoes for the cold months. I've been canning tomato sauce and making sun-dried tomatoes, and I'll probably freeze some too. It takes some extra effort, but I'm sure it'll pay off later. Even in California, where we have a year-round growing season, the cold months of only eating greens can get a bit tiresome. So, here's to one more step toward self-sufficiency, keeping it local, and infusing every meal with delicious home-grown produce!
The most satisfying moment, a full cabinet of goodies for the winter months.

Tuesday, September 18, 2012

New Chickens are Laying!

On Sunday we found our first egg from the new chickens. The chickens are just reaching their 5-month birthdays, and when I saw one of them in the nest box looking all uncomfortable I had a feeling today would be the day. This group of chickens are Barred Rocks, and their pretty dark brown eggs will add a nice color to our cartons which already have white, blue/green, and light brown eggs from our older hens (respectively: Andalusian, Arucana, and Naked Neck). The first eggs are tiny, about two-thirds the size of regular eggs, but they should grow to normal size over the course of the next month. It's good timing too, since our older hens have been laying less over the past month, probably due to either the very hot weather we had or to moulting.
Barred Rock hens munching on a row of old chard. We let the chickens graze on areas that are done for the season, which makes them happy, gives them extra nutrients, adds fertilizer, and supposedly reduces insect populations.

Monday, August 27, 2012

Harvesting Dried Hutterite Beans

One thing we've been interested in lately is whether we can grow a larger portion of our calories here on the farm by growing more things like grains and legumes. These also have the added benefit that they last a long time in storage, so we can eat them and give them to our CSA members over the winter when there are less veggies growing. Last year we grew a small plot of Hutterite beans, which are a white soup bean, somewhat like navy beans. They tasted fantastic and were easy to grow, so this year we planted a lot more.

Since we have very dry summers here, we just leave the plants in the ground until the bean pods are dry and rattle when shaken. Then we pull up the plants and begin the process of shelling the beans. This is where things become difficult. We don't have a machine for this, so we've come up with two old-fashioned methods:
1. Shelling (shucking) the beans one by one, splitting the pods open and dropping the beans into a bowl. It takes forever, but the beans come out nice and clean, and we can work on it while watching movies.
2. Threshing and winnowing (don't you just love the old-timey sound of it?)-- We put the bean plants in a box or bag and step on them until the pods open and release the beans (that's threshing). That's the easy part. Then we have to winnow them, which means separate the beans from the chaff, i.e. all the stuff, like dried leaves and broken pods, that is now mixed up with them. We accomplish this by pouring the beans from one box to into another on a windy day, so that the wind blows the chaff away, and the beans fall into the box. Someday we might modernize and buy an electric fan to help us along.

The harvest isn't done yet, but I think we'll end up with about 15 lbs. of beans from our 60 ft. row.

Tuesday, August 14, 2012

Eggplants of our Dreams


We love eggplants, and this is our first season that we are really having a successful crop of them. The process of getting this to happen has been a long one, but now as the harvest begins, it seems all worth it. The eggplants were seeded indoors on a heat mat back in January and February. Then they grew in the greenhouse until May when we transplanted them outside. We tried to really baby these plants, knowing how susceptible they are to both cold and flea beetle damage. So we planted them in black ground cloth (landscaping fabric), cutting a hole for each plant to grow through. Then we carefully covered the whole row with a sheet of floating row cover and weighed down the edges to keep out pests.

The plants are strong and much bigger than any we've grown before, about 3 ft. tall. Now, 8 months from planting those seeds, we are starting to get a huge amount of eggplants. They are mostly Asian long eggplants, and we also have some Italian-style called Rosa Bianca and some small round ones called Chu.


We started the season off with grilled eggplant and pepper sandwiches with tahini garlic sauce. Yum!

Sunday, July 29, 2012

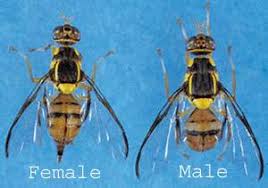
Oriental Fruit Flies


If you live in our area, you may have heard in the news recently about the Oriental Fruit Flies that have been found in Morgan Hill. The Oriental Fruit Fly is an invasive species of insect that destroys many kinds of crops, including tree fruit, tomatoes, cucumbers, and peppers. As of today, four of these flies have been found near Monterey Rd. between Dunne and Tennant. This is frightfully close to our farm and could easily affect our farm and our CSA this year, especially if the county calls for a quarantine of produce. 
We want to make sure to share with you (especially our CSA members) what we know about the Oriental Fruit Fly and what our plans are now that it is here. We hope you will read the following Q&A, and contact us if you have additional questions or concerns.

1. Is the Oriental Fruit Fly dangerous to humans? 
No, the fruit fly is not dangerous to humans, just to produce, which its larvae basically destroy from the inside.

2. What is a produce quarantine? If the county calls for a quarantine, it means that none of the host crops can leave local farms unless they have been treated to eradicate the Oriental Fruit Fly. On our farm, this would affect tomatoes, peppers, and cucumbers for about 1 month. The purpose of the quarantine is to keep the pests from spreading throughout our area, which could have a devastating effect on agriculture here.

3. Are we under quarantine yet? No, our area is not currently under quarantine, but several Oriental Fruit Flies have been found, and if they find more we will be quarantined.

4. What is being done about the fruit flies? The county is proactively treating for these pests. The treatment involves (excuse the technical language here) shooting gobs of goo high into trees and onto utility poles. The goo contains a pheromone that attracts male fruit flies. They then get stuck in the goo, and a low-level pesticide ensures that they die there. No males = no more fruit flies within one life-cycle.

5. How will you treat for the fruit flies at One Acre Farm?  Fortunately, there is an organic-certified pesticide available for this treatment. It's called Spinosad, and it is derived from naturally-occurring bacteria through fermentation. We did some of our own research into this product, and it appears to be very safe to use.

6. What happens to our CSA if the area is quarantined? That will depend in part on the type of quarantine. Some options would be to have smaller CSA bags for a while (without tomatoes, peppers, and cucumbers.... sad, I know). We might be able to supplement more with produce from farms outside the quarantine. We would also offer a refund to those who want one.

Right now, everything is business as usual. Stay tuned, and we'll update you as we learn more. As always, thank you so much for supporting local farms!

Update: As of August 14th, no new fruit flies have been found. This means that we have so far avoided a quarantine. We'll have to keep our fingers crossed for another month though. Meantime, we haven't sprayed the Spinosad because we found out it's quite expensive, about $175/gal.